At this station, your team will check the biodiversity of the aquatic site by
examining insects, snails, worms, copepods, and other small invertebrates
(animals without backbones). You'll focus on invertebrates because they are
generally more plentiful and easier to collect than vertebrates, (fish, turtles,
frogs, etc.) In addition, invertebrates can tell you a great deal about your
aquatic site. A large variety of invertebrates indicates an environment with a
higher likelihood of supporting life. A small variety of invertebrates often
indicates the opposite.
Materials
For the Pre-Field station:
- 2 or 3 empty buckets
- 4 to 6 trays
- 2 Broom handles or dowel rods of similar length, each with a small hole
drilled near one end
- Kitchen sieve, at least 15 cm (6 in) in diameter, with a hole drilled in the
handle
- Nylon stocking (optional)
- Screwdriver and 2 wood screws
- Empty soup can with two holes drilled in it
- Roll of duct tape
- Scissors
- Stopwatch
- Chips with pictures of aquatic animals
- Your team's copy of Master 4a, "Baseline Study and Possible Human Impact
Assessment Form"
- Copy of Master 4c, "Invertebrates," one for each research team
For the Field Experiment:
- 2 or 3 empty buckets for sample collection
- Kitchen sieve
- Trays (Use white or light-colored grocery meat trays or frozen-dinner trays,
making sure to first wash them out.)
- 1 or 2 toy plastic shovels
- 1 or 2 pairs of tweezers
- 1 or 2 magnifying glasses or bug boxes
- Your team's copy of Master 4a, "Baseline Study and Possible Human Impact
Assessment Form"
- Copy of Master 4c, "Invertebrates," one for each research team
Methods
Pre-Field Experiment:
- What kinds of animals do you think you might find at the aquatic site you
will visit? Make a list in your Journal. Now you will build a bottom scraper
and collection net. (If another team has already constructed these items, go
to Step 4.)
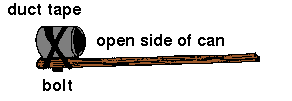
- To build your bottom scraper, take the broom handle or dowel (the one
without the hole drilled in it) and insert it through both of the holes in the
sides of the soup can. It should extend out of the second hole only a few
centimeters. Wrap duct tape around the broom handle and the can to
ensure that the can stays in place on the broom handle. You will use this
bottom scraper to loosen sediment and animals from your aquatic site bed.

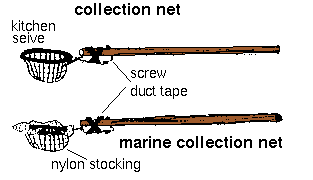
- To construct your collection net, take the kitchen sieve and the broom
handle with the small hole drilled in it, and line up the holes in the two
handles. Put the screw through the holes. Use the screwdriver to tighten
the screw. Wrap duct tape around the sieve and broom handles to reinforce
the attachment. You will use this collection net to collect aquatic animal
samples. If you are going to be working in an ocean habitat, or if you want
to modify the collecting net to collect smaller samples, insert the sieve
(bottom first) into the open end of a nylon stocking. Securely attach the top
of the stocking to the rim of the sieve with duct tape. Then pull the
stocking tight around the body of the sieve and tie a knot at the bottom. Cut
off any excess nylon.

In the first part of this Experiment, you will practice using the collection net
and bottom scraper to collect aquatic animals.
- Because you are in the classroom and not at your aquatic site, your teacher
has given you sample "chips" that depict the types of invertebrates you are
likely to encounter at your aquatic site. Place these chips on the floor.
- To practice using the collection net in the classroom, use a chair to
represent the bank of a stream. Have one team member lean over the chair.
Hold the collection net with the open side toward the aquatic animal
samples you placed on the floor.
- To practice using the bottom scraper, have another team member use the
bottom scraper to gently push the aquatic animal samples toward the
collection net. This simulates the action of loosening the animals from the
bed of the aquatic site.
- The team member with the net should scoop it toward the aquatic animals,
lift them up, and put them in the empty bucket.
- Have another team member time this activity for 1 minute.
- Rotate positions so that all students are able to practice using the collection net and bottom scraper.
- Next, you will prepare the samples for counting and identification. In the
field, your samples will be hidden in the mud that you pick up in the
bottom scraper. You will need to dump the mud into a sieve and sift
through to find the animals. Because there is no mud in this Pre-Field
Experiment, you will skip this step.
- Place your animal samples onto the trays.
- Group the animals according to common physical features. Here are some
questions to get you started. Does the animal have wings? If so, how many?
Does it have legs? If so, how many? Is the body long and slender? Is the
body short and scaly?
- How many different types of animals did you find? Look at Master 4c,
"Invertebrates," to find the names for each type of animal. Then make a list
in your JASON Journal of each type of animal you collected. How does this
list compare to the list your team made earlier of predicted animals you
might find?
- Look at Master 4a. About halfway down, you will see three groupings of
invertebrates. This represents a biotic index. A biotic index is a scale that
uses the types of organisms living in a site to indicate the site's likely ability to support life. Group 1 animals are found in very "healthy"
environments. Therefore they have a high number of points associated
with them-a high "biotic value." For example, you will see the number 10
next to the stone fly nymph. This means that the stone fly nymph has a
high biotic value-its presence water with a high ability to support life.
Now look at the aquatic worm in Group 3. How many points are associated
with the aquatic worm? What do you think the presence of many aquatic
worms would indicate about the ability of a body of water to support life?
- Using the information on Master 4a, you will calculate the number of
points or "biotic value" associated with your invertebrate sample. To do
this, look at the list you made in Step 13. Then look at the biotic index. Put
a check mark next to each type of animal that appears on your list. If an
animal appears in your sample at least once, your sample will get the
number of points associated with that animal. Then, for each group, you
should add up the points associated with the animals you checked. Enter
the total for each group on Master 4a.
EXAMPLE 1: Suppose you find one mayfly and one caddisfly in your
sample. You should add 10 points (for the mayfly) plus 10 points (for the
caddisfly), for a total of 20 points in Group 1.
EXAMPLE 2: Suppose you find two mayflies and 3 caddisflies in your
sample. Your sample will still receive 10
- 10 = 20 points for Group 1.
Even if you find more than one of a certain type of invertebrates, you
will count it only once.
If your samples were real animals, what would your group totals tell you
about the water from which they were collected?
- Add the group totals together to get a grand total, and enter that number
on Master 4a. Find that number in the table below. What does this tell you
about the water?
Biotic index greater than 22 means Excellent ability to support life.
Biotic index between 12 and 22 means Good ability to support life.
Biotic index between 10 and 16 means Fair ability to support life.
Field Experiment
- One of your team members should stand at the edge of the water holding
the collection net so that water is flowing into the open side of net.
- Another team member should gently push the bottom scraper back and
forth across the bed of the aquatic site to loosen any animals, then push
them toward the collection net.
- The team member with the net should scoop the net toward the loosened
sediment, lift it out of the water, and dump it into an empty bucket.
- Have each team member collect one or two nets full of sediment. Then
rotate positions so that each team member takes a turn using the collection
net and bottom scraper.
- Now it's time to take a population count! Use the plastic shovel to scoop
some of the sediment from the bucket into the sieve.
- Gently pour water into the sieve so that the sediment washes through the
screening.
- Remove any animals left in the sieve and place them onto the trays. Use
tweezers if necessary.
- Repeat steps 5, 6, and 7 until you have removed all of the samples from the
sediment.
- Use Master 4c, "Invertebrates," to identify and sort the animals. Use a
magnifying glass or bug box to help you distinguish the features of each
sample. How many different types of animals did you collect? Did you
collect any animals that are not on Master 4a, "Baseline Study and Possible
Human Impact Assessment Form"? Are they vertebrates or invertebrates?
What do you think the presence of these other animals tell you about the
water?
- Did most of your animals fall into Group 1, Group 2, or Group 3? What
does this tell you about the aquatic site?
- Use the biotic index on Master 4a to compute the biotic index of your
sample. Follow the procedure described in Step 15 of the Pre-Field
Experiment. Use the table below to determine your water's ability to
support life.
Biotic index greater than 22 means Excellent ability to support life.
Biotic index between 12 and 22 means Good ability to support life.
Biotic index between 10 and 16 means Fair ability to support life.
Biotic index lower than 10 means Poor ability to support life.
Conclusions
After you have conducted both the Pre-Field and Field Experiments, discuss
the following questions within your research team and record your answers
in your JASON Journal.
- What types of invertebrates did you expect to find at your aquatic site? How
did your actual sampling compare to your expectations?
- What did your sampling indicate about your site?
- What new questions does your group have?

Return to the Aquatic Field Investigation
JASON VII Home Page


JASON Project Homepage ||
Teachers' Guide ||
Students' Corner ||
Search
Gene Carl Feldman
(gene@seawifs.gsfc.nasa.gov)
(301) 286-9428
Todd Carlo Viola, JASON Foundation for Education (todd@jason.org)
Revised: 3 Nov 1995

